Remove Undesired Objects From Your Images With Artificial Intelligence!
Learn how this algorithm can understand images and automatically remove the undesired object or person and save your future Instagram post!

Watch the video
You’ve most certainly experienced this situation once: You take a great picture with your friend, and someone is photobombing behind you, ruining your future Instagram post. Well, that’s no longer an issue. Either it is a person or a trashcan you forgot to remove before taking your selfie that’s ruining your picture. This AI will just automatically remove the undesired object or person in the image and save your post. It’s just like a professional photoshop designer in your pocket, and with a simple click!
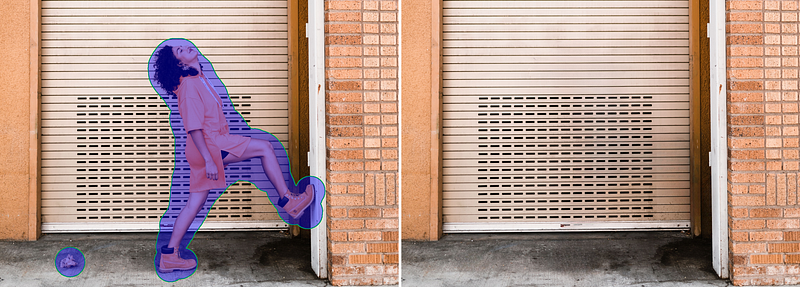
This task of removing part of an image and replacing it with what should appear behind has been tackled by many researchers for a long time. It is called image inpainting, and it’s extremely challenging. As we will see, the paper I want to show you achieves it with incredible results and can do it easily in high-definition, unlike previous approaches you may have heard of before. You definitely want to stay until the end of the article to see that. You won’t believe how great and realistic it looks for something produced in a split second by an algorithm!
To remove an object from an image, the machine needs to understand what should appear behind this object. And to do this would require having a 3-dimensional understanding of the world as humans do, but it doesn’t have that. It just has access to a few pixels in an image, which is why it is so complicated, whereas it looks quite simple for us that can simply imagine the depths and guess that there should be the rest of the wall, here the window, etc..
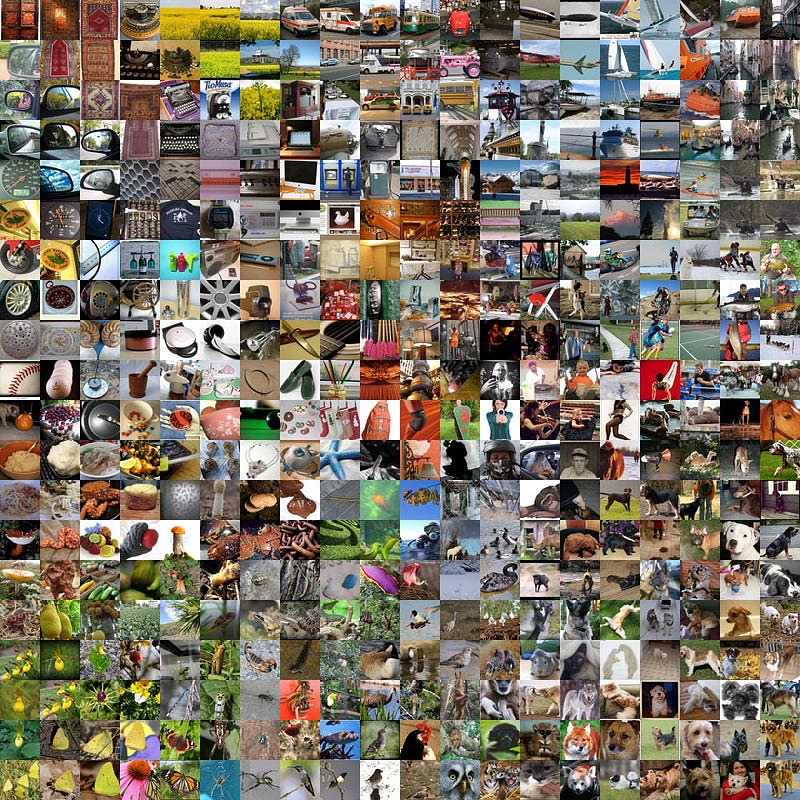
We basically need to teach the machine how the world typically looks like. So we will do that using A LOT of examples of real-world images so that it can have an idea of what our world looks like in the two-dimensional picture world, which is not a perfect approach but does the job.
Then, another problem comes with the computational cost of using real-world images with way too many pixels. To fix that, most current approaches work with low-quality images, so a downsized version of the image that is manageable for our computers, and upscale the inpainted part at the end to replace it in the original image, making the final results look worse than what it could be. Or at least they won’t look great enough to be shared on Instagram and have all the likes you deserve. You can’t really feed it high-quality images directly as it will take way too much time to process and train. Or can you?
The model: LaMa
Well, these are the main problems the researchers attacked in this paper, and here’s how…
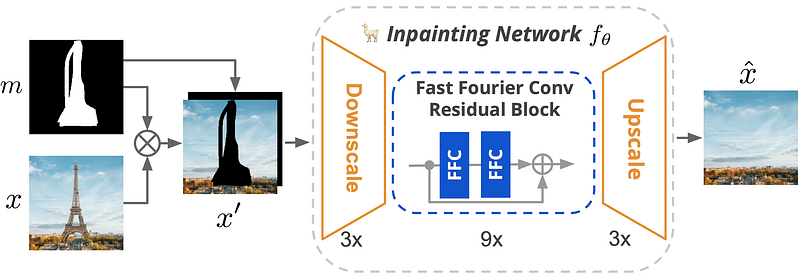
Roman Suvorov et al. from Samsung Research introduced a new network called LaMa that is quite particular. As you can see above, in image inpainting you would typically send the initial image as well as what you’d like to remove from it. This is called a mask (black and white image above) and will cover the image, as you can see here, and the network won’t have access to this information anymore as it needs to fill in the pixels.

Then, it has to understand the image and try to fill in the same pixels it thinks should fit best. So, in this case, they start like any other network and downscale the image, but don’t worry, their technique will allow them to keep the same quality as a high-resolution image. This is because here, in the processing of the image, they use something a bit different than usual.
Typically, we can see different networks here in the middle, mostly convolutional neural networks. Such networks are often used on images due to how convolutions work, which I explained in other articles, like this one if you are interested in how it works.
In short, the network will work in two steps:
First, it will compress the image and try to only save relevant information.
The network will end up conserving mostly the general information about the image like its colors, overall style, or general objects appearing, but not precise details. Then, it will try to reconstruct the image using the same principles but backward. We use some tricks like skip-connections that will save information from the first few layers of the network and pass it along the second step so that it can orient it towards the right objects. In short, it easily knows that there’s a tower with a blue sky and trees, called global information, but it needs these skip connections to know that it’s the Eiffel tower in the middle of the screen, there are clouds here and there, the trees have these colors, etc. All the fine-grain details, which we call local information.
Following a long training with many examples, we would expect our network to reconstruct the image or at least a very similar image that contains the same kind of objects and be very similar if not identical to the initial image.

But remember, in this case, we are working with lower quality images that we need to upscale, which will hurt the quality of the results. The particularity here is that instead of using convolutions as in regular convolutional networks and skip connections to keep local knowledge, it uses what we call the Fast Fourier Convolution or FFC. This means that the network will work in both the spatial and frequency domains and doesn’t need to get back to the early layers to understand the context of the image. Each layer will work with convolutions in the spatial domain to process local features and use Fourier convolutions in the frequency domain to analyze global features. The frequency domain is a bit special, and I linked a great video covering it in the references below if you are curious. It will basically transform your image into all possible frequencies, just sound waves representing someone talking but with images, and tell you how much of each frequency the image contains. So each “pixel” of this newly created image will represent a frequency covering the whole spatial image and how much it is present, instead of colors. The frequencies here are just the repeated patterns at different scales.
For example, one of these frequency pixels could be highly activated by the vertical lines at a specific distance from each other. In this case, it could be the same distance as the length of a brick, so it would be highly activated if there is a brick wall in the image. From this, you’d understand that there’s probably a brick wall of the size proportional to how much it is activated. And you can repeat this for all pixels being activated for similar patterns, giving you good hints on the overall aspect of the image but nothing about the objects themselves or the colors. The spatial domain will take charge of this.
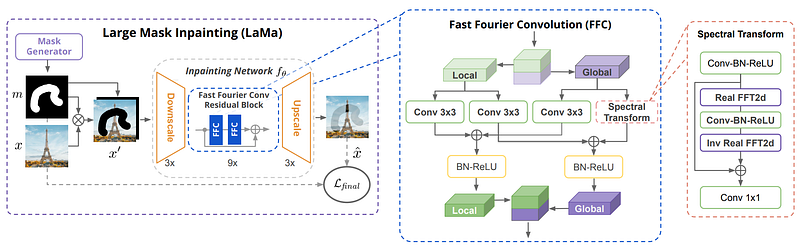
So doing convolutions on this new Fourier image allows you to work with the whole image at each step of the convolution process, so it has access to a much better global understanding of the image even at early layers without much computational cost, which is impossible to achieve with regular convolutions. Then, both global and local results are saved and sent to the next layers, which will repeat these steps. You will end up with the final image that you can upscale back. The use of the Fourier domain is what makes it scalable to bigger images as the image resolution doesn’t affect the Fourier domain since it uses frequencies over the whole image instead of colors, and the repeated patterns it’s looking for will be the same whatever the size of the image. Meaning that even when training this network with small images, you will be able to feed it much larger images afterward and get amazing results.
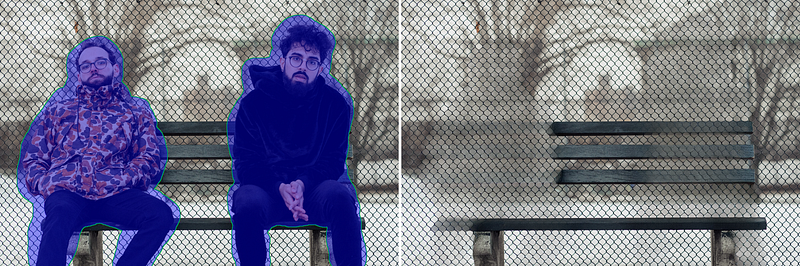
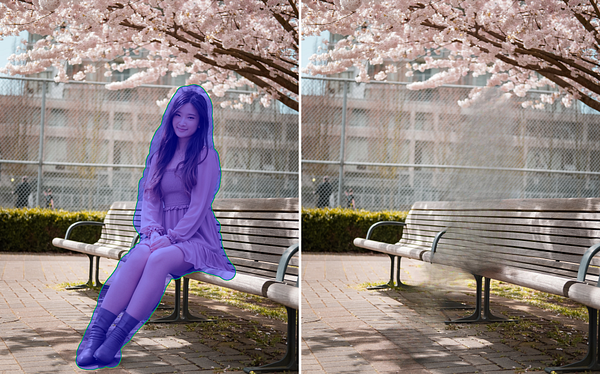
As you can see, the results are not perfect, but they are quite impressive, and I’m excited to see what they will do next to improve them!
Of course, this was just a simple overview of this new model, and you can find more detail about the implementation in the paper linked in the description below. I hope you enjoyed the article, and if so, please take a second to share it with a friend that could find this interesting!
Thank you for reading.
If you like my work and want to stay up-to-date with AI, you should definitely follow me on my other social media accounts (LinkedIn, Twitter) and subscribe to my weekly AI newsletter!
To support me:
- The best way to support me is by being a member of this website or subscribing to my channel on YouTube if you like the video format.
- Follow me here or on medium
- Want to get into AI or improve your skills, read this!
References
- Suvorov, R., Logacheva, E., Mashikhin, A., Remizova, A., Ashukha, A., Silvestrov, A., Kong, N., Goka, H., Park, K. and Lempitsky, V., 2022. Resolution-robust Large Mask Inpainting with Fourier Convolutions. In Proceedings of the IEEE/CVF Winter Conference on Applications of Computer Vision (pp. 2149–2159)., https://arxiv.org/pdf/2109.07161.pdf
- Code: https://github.com/saic-mdal/lama
- Colab Demo: https://colab.research.google.com/github/saic-mdal/lama/blob/master/colab/LaMa_inpainting.ipynb
- Product using LaMa: https://cleanup.pictures/
- Fourier Domain explained by the great @3Blue1Brown: https://youtu.be/spUNpyF58BY