This AI makes blurry faces look 8 times sharper! SwinIR: Photo Upsampling
Transform your small 512-pixel large images into 4k with AI!

Watch the video
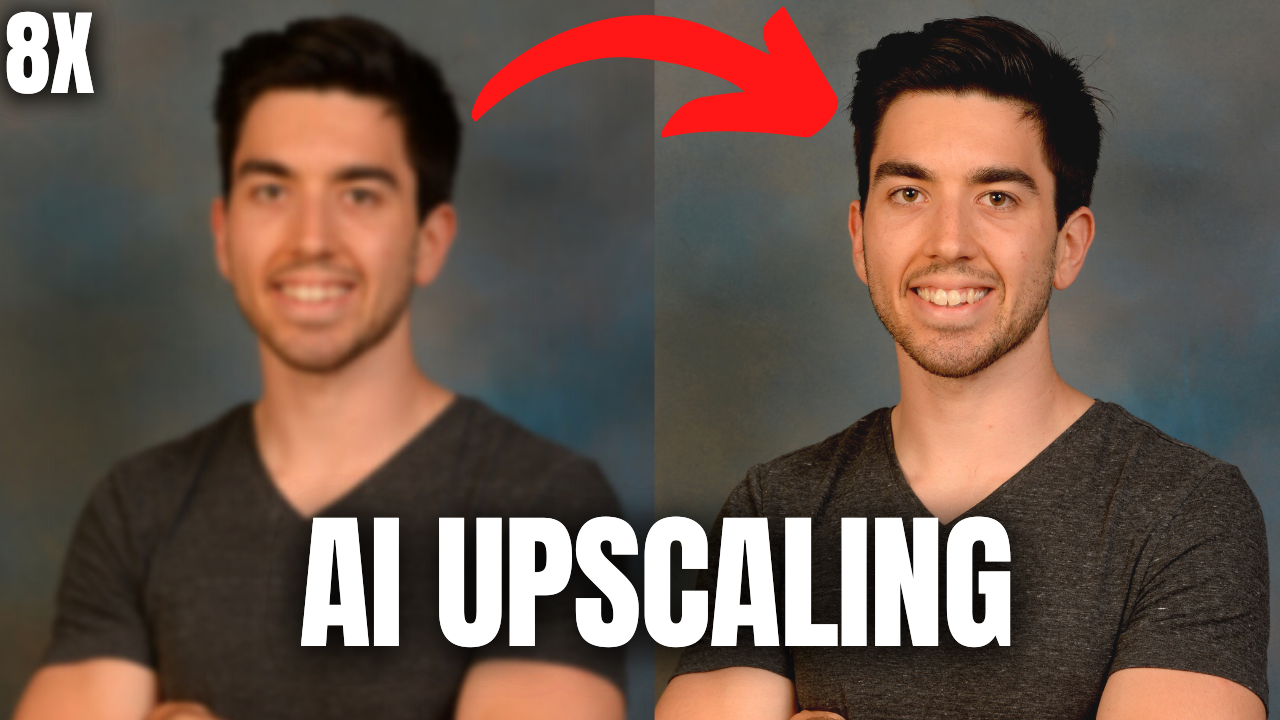
Have you ever had an image you really liked and could only manage to find a small version of it that looked like this image above on the left? How cool would it be if you could take this image and make it twice look as good? It’s great, but what if you could make it even four or eight times more high definition? Now we’re talking, just look at that. Here we enhanced the resolution of the image by a factor of four, meaning that we have four times more height and width pixels for more details, making it look a lot smoother. The best thing is that this is done within a few seconds, completely automatically, and works with pretty much any image. Oh, and you can even use it yourself with a demo they made available, as we will see during the video.

Image Upsampling
Before getting into this amazing model, we have to introduce the concept of photo upsampling or image super-resolution. The goal here is to construct a high-resolution image from a corresponding low-resolution input image, which is a face in this case, but it can be any object, animal, or landscape. The low-resolution will be such as 512 pixels or smaller, not that blurry, but it is clearly not high definition when you have it full screen.
Just take a second to look at it, and you’ll see the artifacts. We take this low definition image and transform it into a high definition image with a much clearer face. In this case, a 2048 pixel square image, which is four times more HD:
To achieve that, we usually have a typical UNet-like architecture with convolutional neural networks, which I covered in many articles before, which I invite you to read if you’d like to learn more about how they work. The main downside is that CNNs have difficulty adapting to extremely broad datasets since they use the same kernels for all images, which makes them great for local results and generalization but less powerful for the overall results when we want the best results for each individual image.
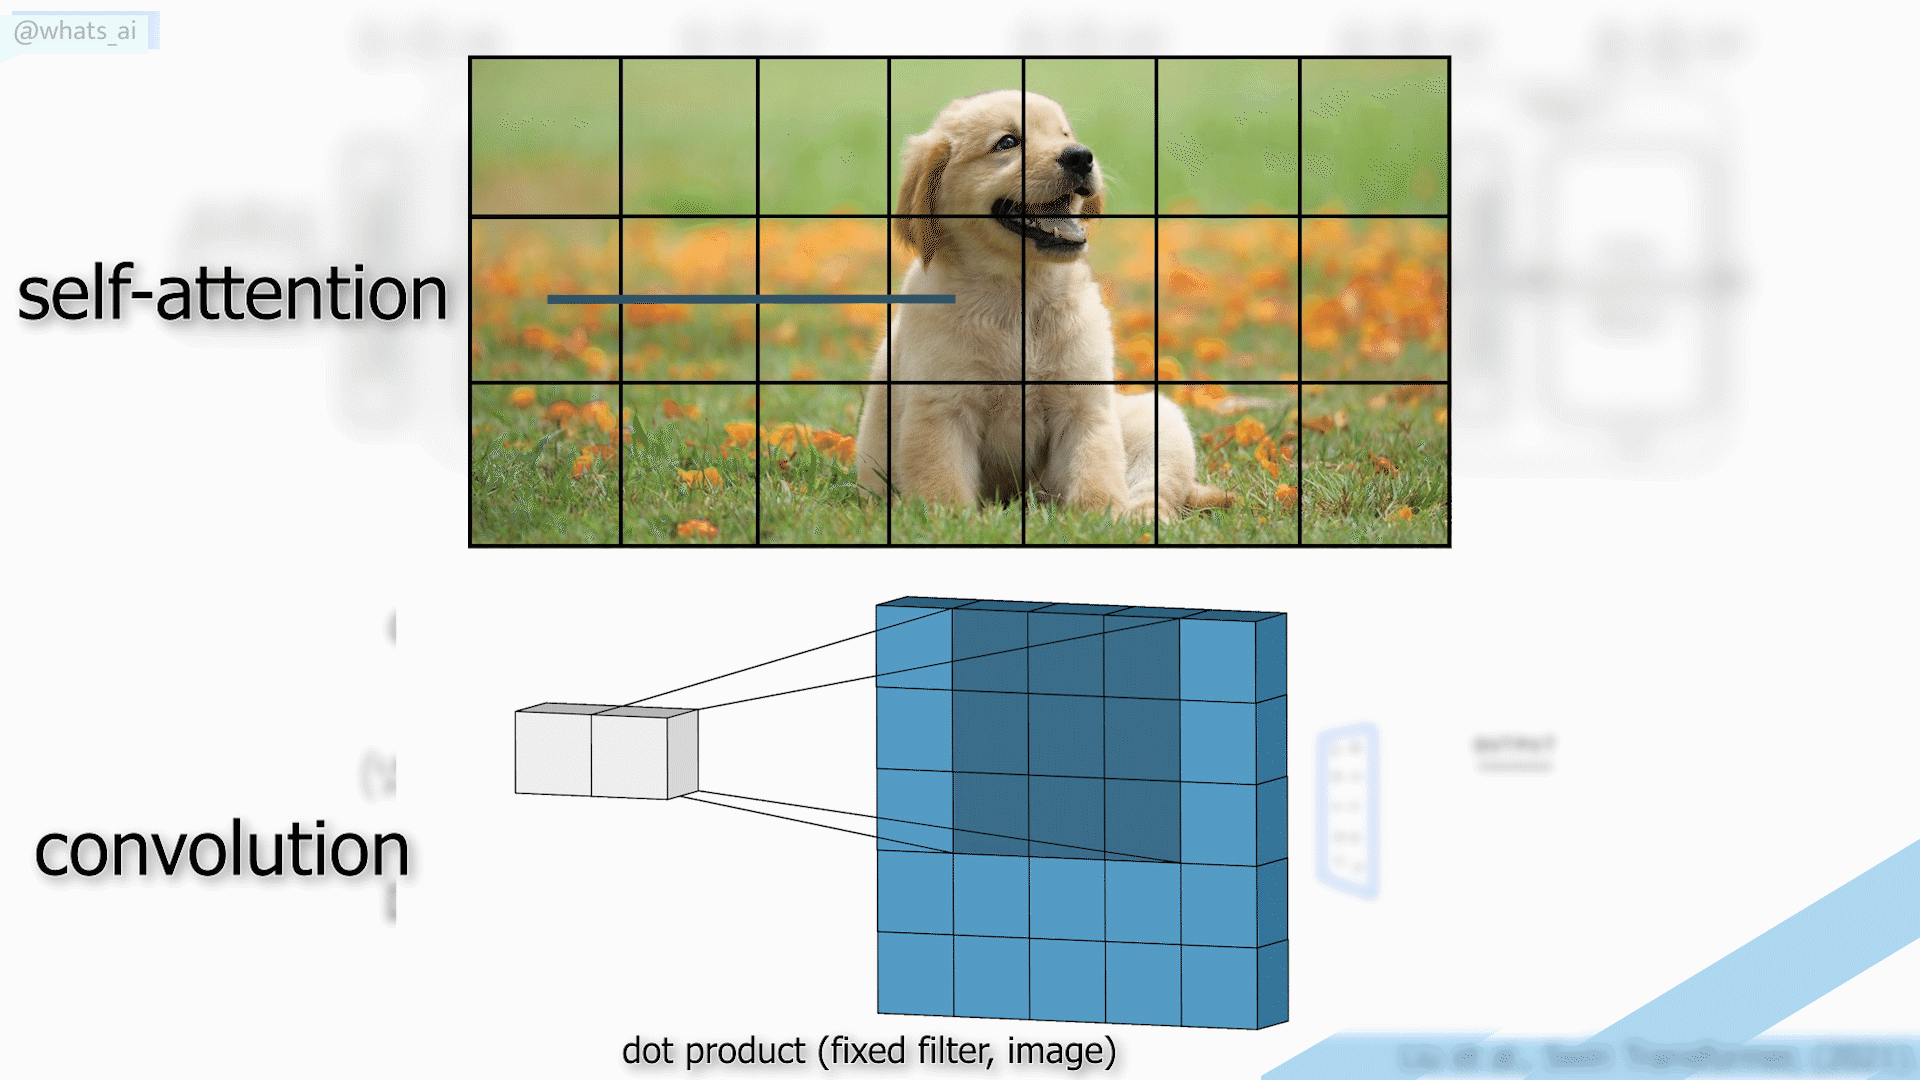
On the other hand, transformers are a promising architecture due to the self-attention mechanism capturing global interactions between contexts for each image but have heavy computations that are not suitable for images.
Here, instead of using CNNs or transformers, they created the same UNet-like architecture with both convolution and attention mechanisms. Or, more precisely, using the Swin transformer. The Swin transformer is amazing since it has the advantage of the CNNs to process images of larger size and prepare them for the attention mechanisms. And these attention mechanisms will create long-range connections so that the model understands the overall image much better in the end and can also recreate the image in a better way. I won’t enter into the details of the Swin transformer as I already covered this architecture a few months ago and explain its differences with CNNs and classical transformer architectures used in natural language processing.
If you’d like to learn more about it and how the researchers applied transformers to vision, check out my article on Towards AI and come back for the explanation of this upsampling model!
SwinIR
The model is called SwinIR and can do many tasks, which include image upsampling. As I said, it uses convolutions to allow for bigger images. More precisely, they use a convolutional layer to reduce the size of the image, which you can see here.
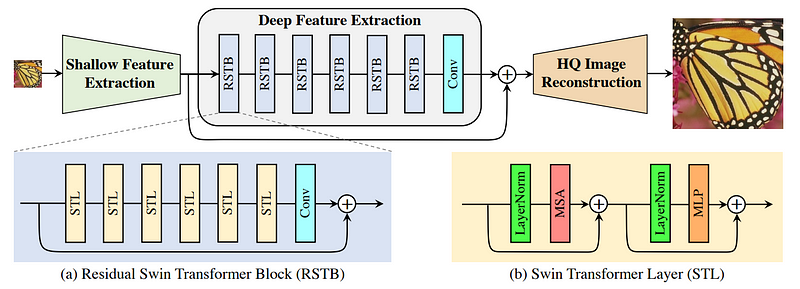
This reduced image is sent into the model and also passed directly to the reconstruction module to give the model general information about the image. This representation will basically look like many weird blurry versions of the image, giving valuable information to the upscaling module about how the overall image should look like. Then, we see the Swin transformer layers coupled with convolutions. This is to compress the image further and always extract more valuable precise information about both the style and details while forgetting about the overall image. This is why we then add back the convoluted image to give the overall information we lack with a skip connection.

All of this is finally sent into a reconstruction module called sub-pixel, which looks like this and uses both the larger general features and smaller detailed features we just created to reconstruct a higher definition image. You can see this as a convolutional neural network but in reverse, or simply a decoder, taking the condensed features we have and reconstructing a bigger image from it. Again, if you’d like to learn more about CNNs and decoders, you should check some of the articles I made covering them.
So you basically send your image in a CNN, take this new representation, save it for later while also sending it in the Swin transformer architecture to condense the information further and learn the most important features to reconstruct. Then, you take these new features with the saved ones and use a decoder to reconstruct the high-definition version.
And voilà!
Now you only need enough data, and you will have results like this (see the video!).
Of course, as with all research, there are some limitations. In this case, probably due to the initial convolutional layer, it doesn’t work that well with very small images under 200 pixels wide.
It seems like you can also remove wrinkles using the bigger upscalers, which can be a useful artifact if you’re looking to do that. Other than that, the results are pretty crazy, and for having played with it a lot in the past few days, the four times upscaling is incredible.
And you can play with it too! They made the GitHub repo available for everyone with pre-trained models and even a demo you can play with right away without any code. Of course, this was just an overview of this amazing new model, and I would strongly invite you to read their paper for a deeper technical understanding. All the links are in the references below. Let me know what you think, and I hope you’ve enjoyed this article!
Thank you once again to Weights & Biases for sponsoring the video and article and to anyone still reading!
See you next week with another exciting paper!
Read the Spanish translation by a friend of mine here!
If you like my work and want to stay up-to-date with AI, you should definitely follow me on my other social media accounts (LinkedIn, Twitter) and subscribe to my weekly AI newsletter!
To support me:
- The best way to support me is by being a member of this website or subscribing to my channel on YouTube if you like the video format.
- Follow me here or on medium
- Want to get into AI or improve your skills, read this!
References
- Liang, J., Cao, J., Sun, G., Zhang, K., Van Gool, L. and Timofte, R., 2021. SwinIR: Image restoration using swin transformer. In Proceedings of the IEEE/CVF International Conference on Computer Vision (pp. 1833–1844).
- Code: https://github.com/JingyunLiang/SwinIR
- Demo: https://replicate.ai/jingyunliang/swinir