Tesla's Autopilot Explained! Tesla AI Day in 10 Minutes
Andrej Karpathy's talk on Tesla's autopilot explained clearly in under 10 minutes

Watch the video and support me on YouTube!
If you wonder how a Tesla car can not only see but navigate the roads with other vehicles, this is the article you were waiting for. A couple of days ago was the first Tesla AI day where Andrej Karpathy, the Director of AI at Tesla, and others presented how Tesla’s autopilot works from the image acquisition through their eight cameras to the navigation process on the roads.
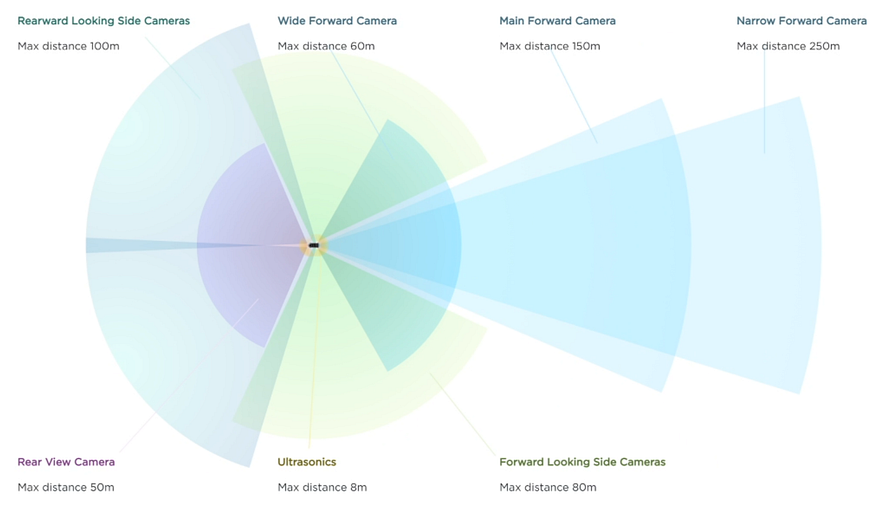
Tesla’s cars have eight cameras like this illustration, allowing the vehicle to see their surroundings and far in front. Unfortunately, you cannot simply take all the information from these eight cameras and send it directly to an AI that will tell you what to do, as this would be just way too much information to process at once and our computers aren’t this powerful yet. Just imagine trying to do this yourself, having to process everything all around you. Honestly, I find it difficult to turn left when there are no stop signs, and you need to check both sides multiple times before taking a decision.
Well, it’s the same for neural networks, or more precisely for computing devices like CPUs and GPUs.
To attack this issue, we have to compress the data while keeping the most relevant information similar to what our brain does with the information coming from our eyes. To do this, Tesla transfers these eight cameras’ data into a smaller space they call the much smaller “vector space”.
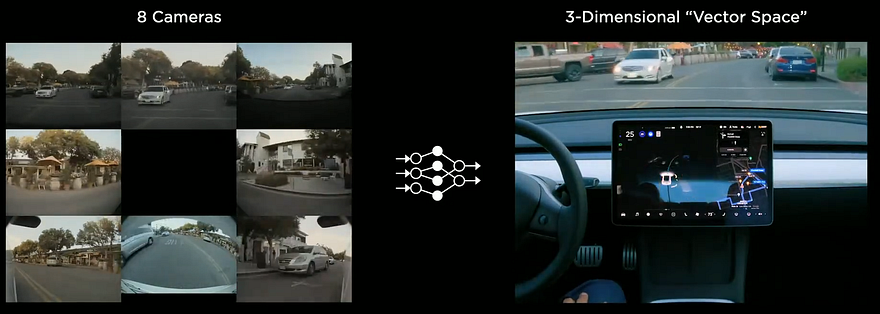
This space is a 3-dimensional space that looks just like this and contains all the relevant information in the world like the road signs, cars, people, lines, etc. This new space is then used for many different tasks the car will have to do like object detection, traffic light tasks, lane prediction, etc.
But how do they go from 8 cameras, which would mean eight times three dimensions inputs composed of Red-Green-Blue images, to a single output in 3 dimensions? This is achieved in 4 steps and done in parallel for all eight cameras, making it super-efficient.

Step 1 — Cameras and Rectification Module
At first, the images are sent into a rectification module, which takes the images, and calibrates them by translating them into a virtual representation. This step dramatically improves the autopilot’s performance because it makes the images look more similar to each other when nothing is happening, allowing the network to compare the images more easily and focus on essential components that aren’t part of the typical background.
Step 2 — The information extraction
Then, these new versions of the images are sent into a first network called RegNet. This RegNet is just an optimized version of the convolutional neural network architecture CNNs. If you are not familiar with this kind of architecture, you should take a break and quickly watch the simple explanation I made. Basically, it takes these newly made images, compresses the information iteratively like a pyramid where the start of the network is composed of a few neurons representing some variations of the images focusing on specific objects, telling us where it is spatially. The deeper we get, the smaller these images will be, but they will represent the overall images while also focusing on specific objects. So, at the end of this pyramid, you will end up with many neurons, each telling you general information about the overall picture, whether it contains a car, a road sign, etc.
Step 3 — Merging the important features
In order to have the best of both worlds, we extract information at multiple levels of this pyramid, which can also be seen as image representations of different scales focusing on specific features in the original image. We end up with local and general information, all of them telling us what the images are composed of and where.
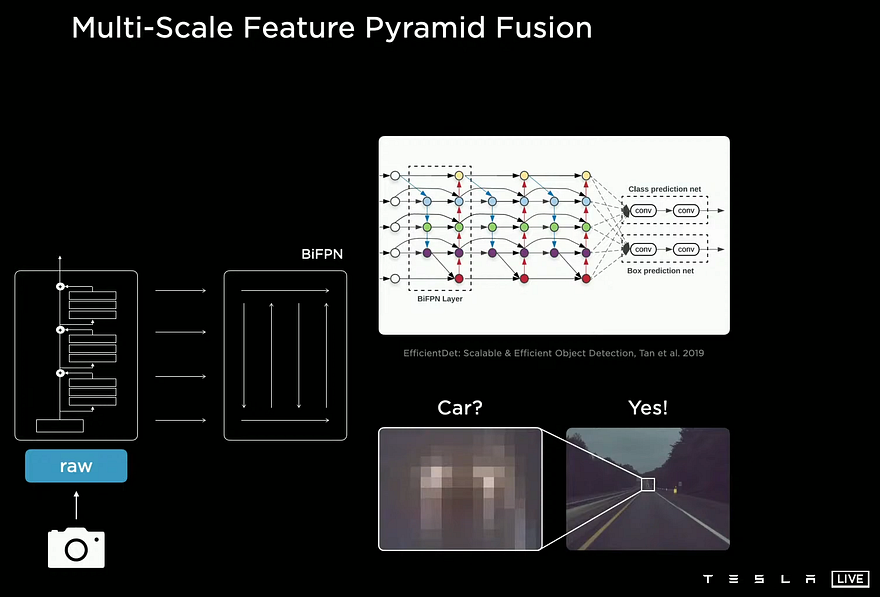
Then, this information is sent into a model called BiFPN, which will force this information from different scales to talk together and extract the most valuable knowledge among the general and specific information it contains. The output of this BiFPN network will be the most interesting and useful information from all these different scales of the eight cameras. So it contains both the general information about the images, which is what it contains and the specific information, such as where it is, what size, etc. For example, it will use the context coming from the general knowledge of deep features extracted at the top of the pyramid to understand that “since these two blurry lights are on the road between two lanes, they are probably attached to a specific object that was identified from one camera in the early layers of the network.”

Using both this context and knowing it is part of a single object, one could successfully guess that these blurry lights are attached to a car.
Step 4 — Fuse the information of the 8 cameras into one representation
So now we have the most useful information coming from different scales for all eight cameras. We need to compress this information so we don’t have eight different data inputs, and this is done using a transformer block. If you are not familiar with transformers, I will invite you to watch my video covering them in vision applications. In short, this block will take the eight different picture’s condensed information we have and transfer it into the 3-dimensional space we want, the vector space. It will take this general and spatial information, here called the Key, calculate the Query, which is of the dimension of our vector field, and tries to find out what goes where. For example, one of these queries could be seen as a pixel of the resulting vector space looking for a specific part of the car in front of us. The value would merge both of these accordingly, telling us what is where in this new vector space. This transformer can be seen as the bridge between the eight cameras and this new 3D space to understand all inter-relations between the cameras.
The time problem…
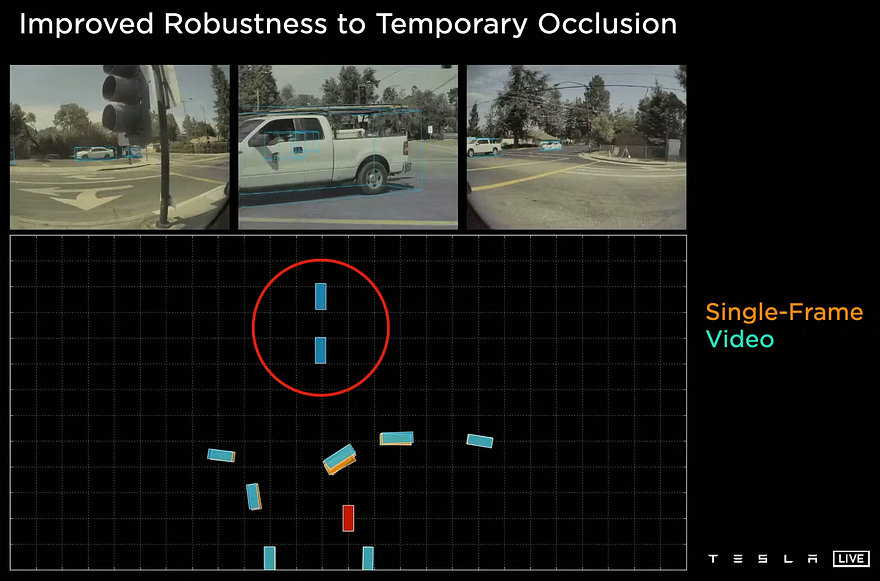
Now that you have finally condensed your data into a 3D representation, we can start the real work. This is the space where they annotate the data they use for training their navigation network, as this space is much less complex than eight cameras and easier to annotate. Okay, so we have an efficient way of representing all our eight cameras now, but we still have a problem: single-camera inputs are not intelligent. If a car on the opposite side is occluded by another car, we need the autopilot to know it is still there and it hasn’t disappeared because another car went in front of it for a second. To fix this, we have to use time information or, in other words, use multiple frames. They chose to use a “feature queue” and a “video module”.
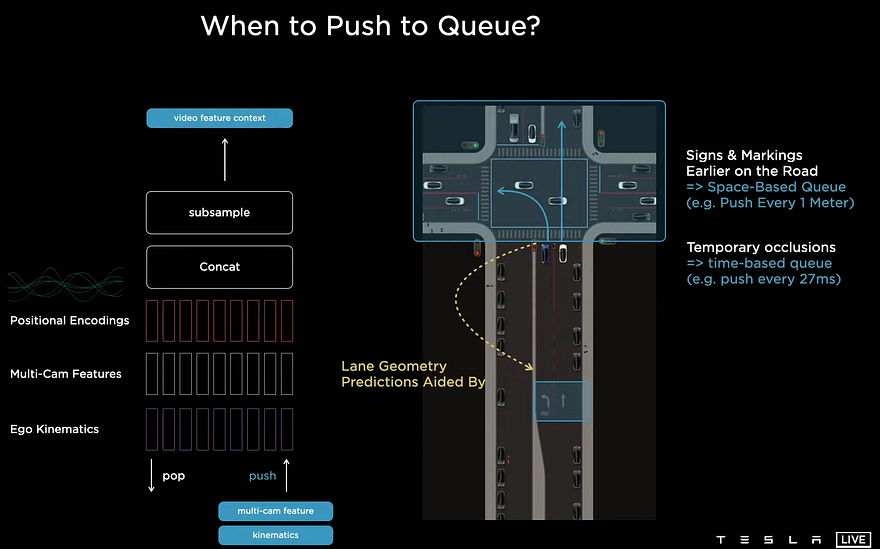
The feature queue will take a few frames and save them in the cache. Then for every meter, the car does or every 27 ms, it will send the cached frames to the model. Here they use both a time or a distance measure to cover when the car is moving and stopped. Then, these 3D representations of the frames we just processed are merged with their corresponding positions and Kinematic data containing the car’s acceleration and velocity, informing us how it is moving at each frame.
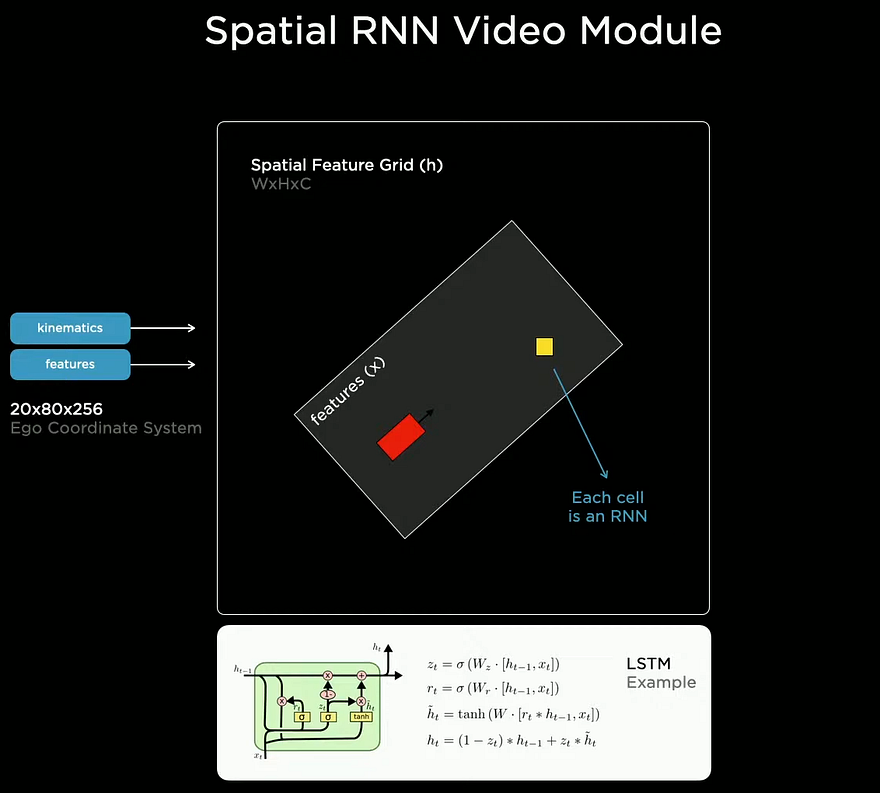
All this precious information is then sent into the video module. This video module uses these to understand the car itself and its environment in the present and past few frames. This understanding process is made using a recurrent neural network that processes all this information iteratively over all frames to understand the context better and finally build this well-defined map you see. If you are not familiar with recurrent neural networks, I will again orient you to a video I made explaining them. Since it uses past frames, the network now has much more information to understand better what is happening, which will be necessary for temporary occlusions.
This is the final architecture of the vision process with its output on the right, and below, you can see some of these outputs translated back into the images to show what the car sees in our representation of the world, or rather the eight camera’s representation of it. We finally have this video module output that we can send in parallel to all the car’s tasks, such as object detection, lane prediction, traffic lights, etc.
Let’s summarize…
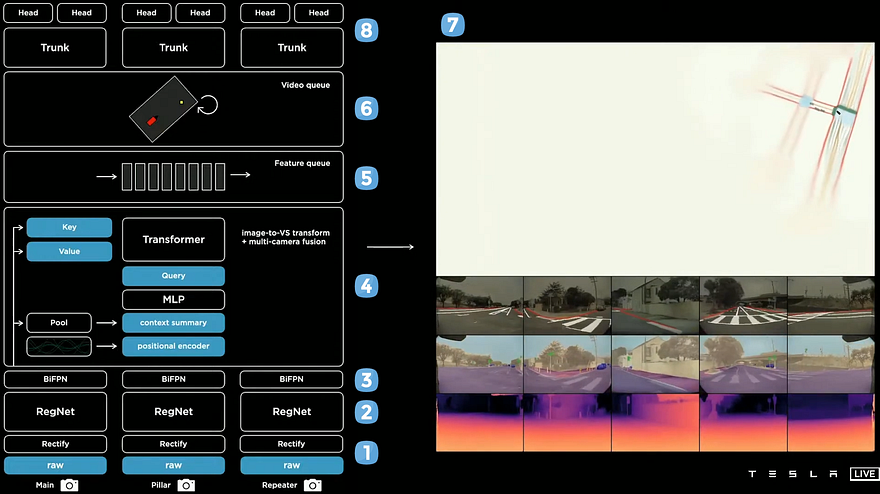
If we summarize this architecture, we first have the eight cameras taking pictures. Then, they are calibrated and sent into a CNN condensing the information, which extracts information efficiently and merges everything before sending this into a transformer architecture that will fuse the information coming from all eight cameras into one 3D representation. Finally, this 3D representation will be saved in the cache over a few frames and then sent into an RNN architecture that will use all these frames to better understand the context and output the final version of the 3D space to send our tasks that can finally be trained individually and may all work in parallel to maximize performance and efficiency.
As you can see, the biggest challenge for such a task is an engineering challenge. Make a car understand the world around us as efficiently as possible through cameras and speed sensors so it can all run in real-time and with a close-to-perfect accuracy for many complicated human tasks.
Of course, this was just a simple explanation of how Tesla autopilot sees our world. I’d strongly recommend watching the amazing video on Tesla’s youtube channel linked in the references below for more technical details about the models they use, the challenges they face, the data labeling and training process with their simulation tool, their custom software and hardware, and the navigation. It is definitely worth the time!
Thank you for reading.
Come chat with us in our Discord community: Learn AI Together and share your projects, papers, best courses, find Kaggle teammates, and much more!
If you like my work and want to stay up-to-date with AI, you should definitely follow me on my other social media accounts (LinkedIn, Twitter) and subscribe to my weekly AI newsletter!
To support me:
- The best way to support me is by being a member of this website or subscribe to my channel on YouTube if you like the video format.
- Support my work financially on Patreon
References:
- “Tesla AI Day”, Tesla, August 19th 2021, https://youtu.be/j0z4FweCy4M