AI Facial Editing of Real Videos ! Stitch it in Time Explained
AI-based face manipulations in high-quality talking head videos !


Watch the video:
You’ve most certainly seen movies like the recent Captain Marvel or Gemini Man where Samuel L Jackson and Will Smith appeared to look like they were much younger. This requires hundreds if not thousands of hours of work from professionals manually editing the scenes he appeared in. Instead, you could use a simple AI and do it within a few minutes.

Indeed, many techniques allow you to add smiles, make you look younger or older, all automatically using AI-based algorithms. They are mostly applied to images since it’s much easier, but the same techniques with small tweaks can also be applied on videos, which, as you may suspect, is quite promising for the film industry. And by the way, the results you’ve been seeing were all made using the technique I will discuss in this article.

The main problem is that, currently, these generated “older versions” edited images not only seem weird but when used in a video, will have glitches and artifacts you surely do not want in a million-dollar movie. This is because it’s much harder to get videos of people than pictures, making it even harder to train such AI models that require so many different examples to understand what to do. This strong data dependency is one of the reasons why current AI is far from human intelligence. This is why researchers like Rotem Tzaban and collaborators from Tel Aviv University work hard to improve the quality of automatic AI video editing without requiring so many video examples. Or, more precisely, improve AI-based face manipulations in high-quality talking head videos using models trained with images. It doesn’t require anything except the single video you want to edit, and you can add a smile, make you look younger or older. It even works with animated videos!

This is so cool, but what’s even better is how they achieved that…

Of course, it uses GANs or Generative Adversarial Networks. I won’t go into the inner workings of GANs since I already covered it in an article that you can read right here, but we will see how this is different from a basic GAN architecture. If you are not familiar with GANs, just take a minute to read the article and come back, I’ll still be there waiting for you, and I am not exaggerating. The article literally takes one minute to get an overview of what GANs are!
We will just refresh the part where you have a generative model that takes an image, or rather an encoded version of the image, and changes this code to generate a new version of the image modifying specific aspects, if possible.
Controlling the generation is the challenging part as it has so many parameters, and it’s really hard to find which parameters are in charge for what and disentangle everything to only edit what you want.

So it uses any generative-based architecture such as StyleGAN in this case. Which is simply a powerful GAN architecture for images of faces published by NVIDIA a few years ago with still very impressive results and newer versions. But the generative model itself is not that important as it can work with any powerful GAN architecture you can find.
And yes, even if these models are all trained for images, they will use them to perform video editing! Assuming that the video you will send is realistic and already consistent, they will simply focus on maintaining realism rather than creating a real consistent video as we have to do in video synthesis work,
where we create new videos out of the blue.
So each image will be processed individually, instead of sending a whole video and expecting a new video in return. This assumption makes the task way simpler, but there are more challenges to face, like maintaining such a realistic video where each frame fluently goes to the next without apparent glitches.
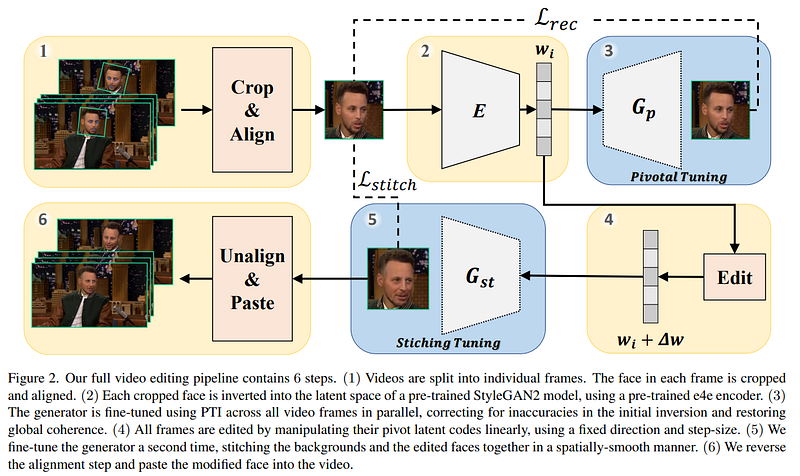
Here, they will take each frame of the video as an input image, extract only the face and align (1) it for consistency, which is an essential step as we will see, use their pre-trained encoder (2) and generator (3) to encode the frames and produce new versions for each. Unfortunately, this wouldn’t fix the realism problem where the new faces may look weird or out of place when going from one frame to another, as well as weird lighting bugs and background differences.
To fix that, they will further train the initial generator (3) and use it to help make the generations across all frames more similar and globally coherent. They also introduce two other steps, an editing step and a new operation that they call “stitching-tuning”.
The editing step (4) will simply take the encoded version of the image and change it a bit. This is the part where it will learn to change it just enough to make the person look older in this case. So the model will be trained to understand which parameters to move and how much to modify the right features of the image to make the person look older. Like adding some gray hair, adding wrinkles, etc.
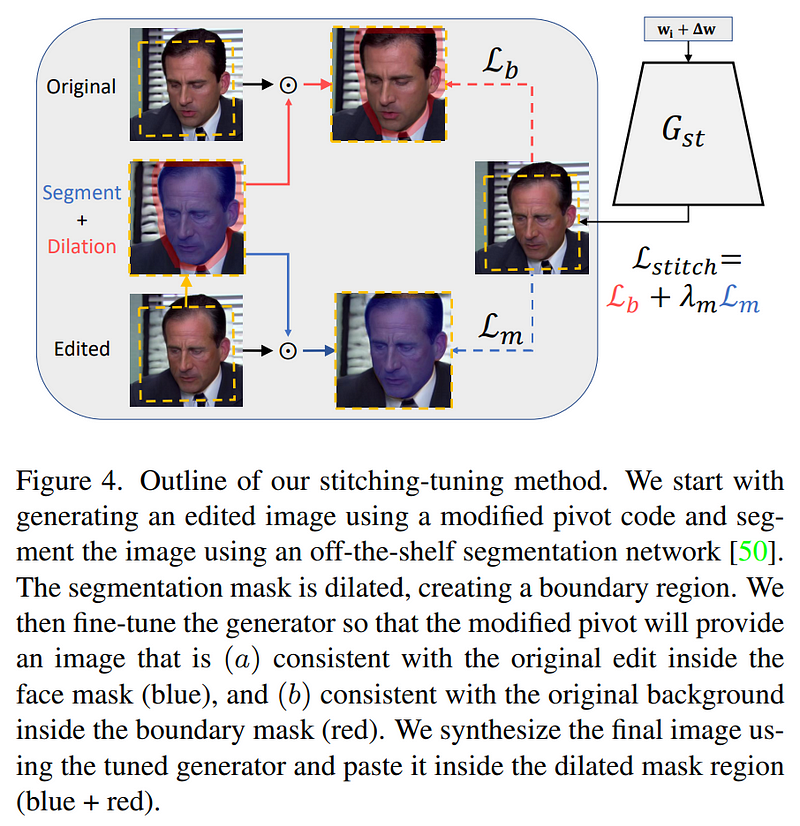
Then, this stitching-tuning method (5) will take the encoded image you see here and will be trained to generate the image from the edited code that will best fit the background and other frames. It will achieve that by taking the newly generated image, comparing it with the original image, and finding the best way to replace only the face using a mask and keep the rest of the cropped image unchanged.
Finally, we paste the modified face back on the frame (6). This process is quite clever and allows for the production of really high-quality videos since you only need the cropped and aligned face in the model, incredibly reducing the computation needs and complexity of the task. So even if the face needs to be small, let’s say 200 pixels squared, as you can see here, if it’s only a fifth of the image, you can keep a pretty high-resolution video.
And voilà! This is how these great researchers perform high-quality face manipulation in videos!

Thank you for reading, watch the video for more examples!
If you like my work and want to stay up-to-date with AI, you should definitely follow me on my other social media accounts (LinkedIn, Twitter) and subscribe to my weekly AI newsletter!
To support me:
- The best way to support me is by being a member of this website or subscribing to my channel on YouTube if you like the video format.
- Follow me here on medium
- Want to get into AI or improve your skills, read this!
References
- What are GANs? Short video introduction: https://youtu.be/rt-J9YJVvv4
- Tzaban, R., Mokady, R., Gal, R., Bermano, A.H. and Cohen-Or, D., 2022. Stitch it in Time: GAN-Based Facial Editing of Real Videos. https://arxiv.org/abs/2201.08361
- Project link: https://stitch-time.github.io/
- Code: https://github.com/rotemtzaban/STIT