The short version
Modern image generators in this guide use two broad processes: diffusion or flow models iteratively refine noise, while autoregressive models predict compressed visual tokens in sequence. Both work in a learned latent space and use attention to condition generation on text or reference images. Prompts set constraints, but the model fills gaps from training patterns, so lock key details, vary one factor at a time, and rerun when context drifts.
- Image models do not draw from words directly. They learn a visual space where prompts guide what kind of image fits.
- The prompt controls constraints, but the model still fills in details from patterns learned during training.
- Better image generation comes from understanding guidance, constraints, style, and where the model invents missing detail.
Watch the video format (highly recommended for all visuals!!):
Every image you’ve ever generated, every thumbnail, every avatar, every weird AI art experiment transforming you into a new style like this, or meme, was made one of two ways.
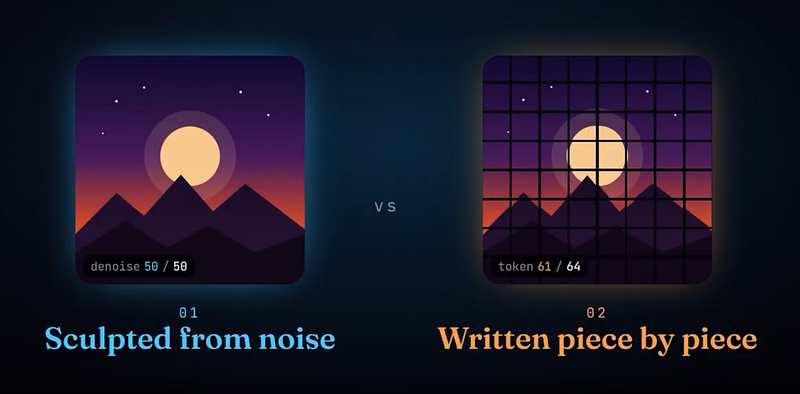
It was either sculpted from noise. Or written one piece at a time, like a sentence. That’s it. Only two families. And every tool you use, Midjourney, ChatGPT, Nano Banana, FLUX, falls into one of them.
Most people think AI image generators work by searching a giant database and stitching pieces together. Like a smart Google Images collage.
And that’s a big misconception.
I’ll show you why it’s wrong, how these tools actually work, and how to use this to get better images with less effort.
I’m Louis-François, CTO and co-founder of Towards AI, and I’ve been covering AI topics on this channel for over 6 years. Today, I’ll explain how image generation actually works, using something I do every week, like making YouTube thumbnails.
Alright, let’s get into it!
I’ve been using Nano Banana through Google’s AI Studio for a while now because it’s fast to iterate and follows thumbnail intent well, especially when you set specific parameters like 16:9 landscape, which you cannot do on most other platforms like the Gemini chat or ChatGPT. But, other than some more control over the result, the workflow is the same whether you use Gemini, ChatGPT, FLUX, or anything else. You write a prompt, maybe attach a photo, and an image appears. So what actually happened between prompt and the pixels you see?
First, many people still believe that AI searches a database, finds pieces that match your prompt, and stitches them together. Like a very sophisticated Google Images collage. It makes sense, especially for me, since I already have hundreds and hundreds of thumbnails ready to get inspiration from.
That’s not what’s happening. And it’s easy to prove. I’ve had friends with basically zero online presence upload a selfie and get back a perfectly stylized version of themselves. If the model was searching and recombining existing images, that wouldn’t work. There’s nothing to find.
What the model actually learned during training is a statistical map of what images look like and how text relates to visual structure. Skin texture, lens blur, lighting direction, where thumbnail text usually sits, how fabric folds under certain lighting. Not as rules written in English, but as patterns compressed into the model’s weights. Billions of them.
So when you prompt it, the model generates a new image that satisfies two constraints at once: it should look like a plausible image, one like the ones it was trained to replicate, and it should match your instruction, the prompt you give it. That’s the whole game.
But here’s the problem. A single thumbnail is millions of pixel values. Generating those directly would be absurdly expensive for any GPU, even H100S. And this is actually the key insight that made modern image generation work — the thing that unlocked the whole field in the last few years, going from this … to this …
Almost no model generates raw pixels. It would be too impractical to work in such a large space. It would be like working with an LLM with a million tokens in its context every time you use it for just a regular 1080p image. For reference, most LLMs can sustain around 100–200k tokens before results start to worsen, and it forgets many parts of it.

So, as a small hack, these image models generate their “tokens” in what’s called the latent space. We use an encoder that takes your full image and compresses it into a much smaller grid of numbers. A compact blueprint that still captures structure like shapes, layout, lighting, and textures, but with way fewer values. This encoder basically learns to extract key principles of every image instead of raw RGB pixel values, which, when you think about it, totally makes sense. You don’t need to know every single millimetre to copy a piece. You need to know most of it, with all the texture and detail information, and you can guess the missing “pixels”. So this new compressed space, which we call our latent space, the encoder creates is much, much smaller than the original 1-million-or-so tokens. The generation model does all the heavy work in that compressed space. Then a decoder expands the result back into the full resolution image you see.
So, just to rehearse it, as this is the most important part to understand: pixels are the final render. The image itself at the end. The latent space is the blueprint. A single pixel is just a color value — it doesn’t mean anything on its own. In the latent space, each value tends to represent a chunk of meaningful structure because it has to carry more information per number. It’s compression with learned structure, and it’s the reason image generation could scale at all.
This is also another reason why the “it’s copying images” mental model falls apart. What the model learned isn’t a folder of JPEGs. It’s a generative process in a compressed representation space.
FAMILY ONE — SCULPTING FROM NOISE
Now, how does the actual generation happen? There are two fundamentally different approaches, and knowing which one you’re using genuinely helps you understand why your results look the way they do.
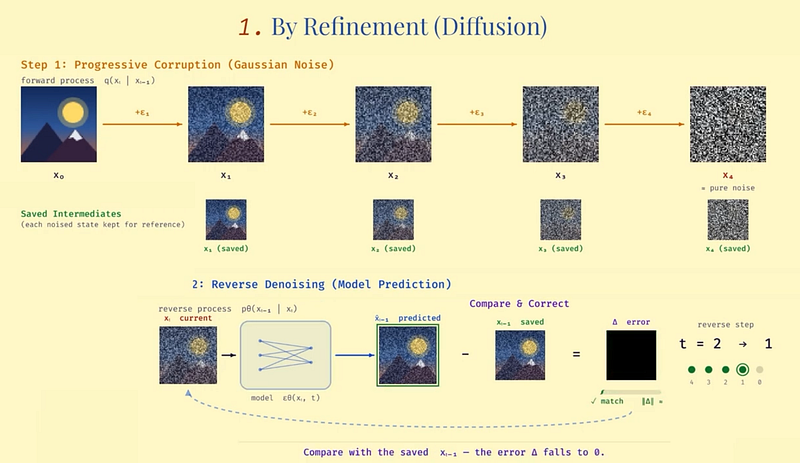
Family one generates by refinement. You might know it as diffusion. The training process is a clever two-step trick that I remember finding really elegant when I first read about it.
Step one: take a real image from the training set and corrupt it by adding noise. Not once, but progressively. A little noise, then more, then more, until the image looks like a 1960s TV screen. And you save each of these intermediate steps to remember what noise you added step after step.
Noise here is just a perturbation you add to the image. You basically shuffle the pixel values around following some kind of pattern, typically a Gaussian pattern, kind of blurring the image little by little until it looks like pure noise.
Step two: train a model to reverse that corruption. Show it a noisy image and ask it to predict what noise was added — how to denoise one step back toward the original. Just one step, asking it to remove just a single noise pass. And you repeat that for all noise steps you applied. You compare the model’s guess at each step against the saved intermediate you remembered, correct it, and repeat. Across millions of examples, across many noise levels, the model gets very good at saying “given this noisy mess, the cleaner version probably looks like this.”
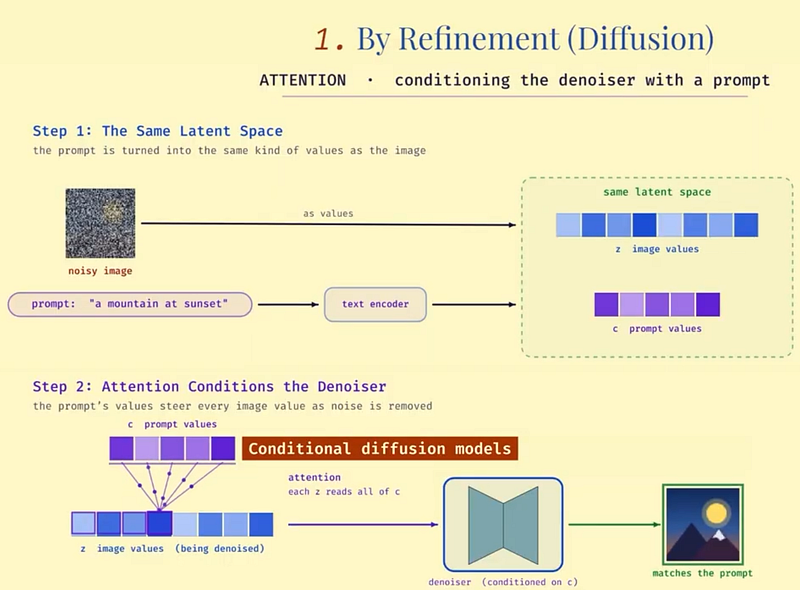
At generation time, you do the same without the true answer. Start from random noise. Apply the denoising model repeatedly. Each step nudges the image a bit closer to something clean and coherent. And your text prompt gets injected through attention at every single step, steering the denoising toward what you asked for.
If you want more visuals, check out the video format https://youtu.be/DCOXcnOntmg ;)
Here, attention simply means that when you inject your prompt, your instructions, it is also transformed into the same latent space, and the values associated with it impact all values being denoised. So you basically “condition” your denoiser, to remove noise BUT do it in a way that makes sense with the information coming from the prompt. This is why we call these models “Conditional diffusion models”, because we condition, or guide it, with the values of our prompts.
So diffusion kinda feels like sculpting. You start with a blob and refine it. And because the updates touch the whole image at each step, the model can correct mistakes mid-way. If the composition drifts early, later steps can pull it back… unless you really fuck up doing too much of a big “denoising” step.
And, by the way, a lot of research is spent studying diffusion models to replace Transformers for their promising speed, since diffusion models generate all tokens at once rather than one-by-one, which means they can produce much longer sequences faster.
The original diffusion models used a type of model we call U-Net as the denoising backbone — basically a convolutional network, inspired from works by Yan LeCunn and others that are really popular in real-time vision applications and, when I was doing my master’s, in all vision-related tasks. It’s shaped like an hourglass and compresses the image down into a smaller latent space, just like we discussed, capturing global context, then expands it back up while reusing fine details through skip connections. They worked, but scaling was awkward. Making U-Nets bigger didn’t give the predictable “bigger is better” improvement that Transformers gave us in language.
So, inspired by the language community, researchers replaced the U-Net with a Transformer. Same idea — treat the latent image as a sequence of patches, process them with self-attention so the model can relate far-apart regions, and use cross-attention to tie text to image structure. That’s the story behind models like FLUX.2, a 32-billion parameter flow matching transformer from Black Forest Labs.
Flow matching, by the way, is mostly an efficiency improvement. Instead of the model taking a meandering route from noise to image, flow matching pushes it toward a straighter path, so you get good results in fewer steps. Same destination, better route.
I know there were a lot of terms we went very quickly over, like attention, self-attention, U-Net, Transformers… This is because the core of these techniques isn’t so important, and we can still get how these images are made without diving too much into the details here. But if you are curious about all these more advanced techniques, I already made a few videos on each, and I’d be happy to do more. Please let me know if you’d watch them (or read them here)!
FAMILY TWO — WRITING AN IMAGE LIKE A SENTENCE
Now, the second way to generate images.
Family two is autoregressive generation. And if you’ve followed how language models work at all from my videos, this one will click fast.
Instead of starting from noise and refining it step by step, as with diffusion-based models, the model generates the image sequentially, token by token, exactly like an LLM writes text one word at a time.
To make this work, the image first has to be converted into tokens. You compress it into a grid of codes again using an encoder again, same as before, that produces fewer parameters from all the pixels we first had. Our tokens. Then the model learns to predict these tokens in order. Given this prompt and these already-generated tokens, what token comes next?
At generation time, you start with nothing and the model writes the image token by token. The prompt influences every prediction through attention again, and if you provide an input photo, the model conditions on that too. Transform me into a Studio Ghibli style is literally “continue writing this image, but follow the new instruction.”
This is where Nano Banana sits. It generates 1,290 tokens per image, autoregressively, the same prediction pattern as Gemini’s text generation but applied to visual tokens. And honestly, you can feel the difference when you use it. For thumbnail work especially, it tends to follow structured instructions — composition, text placement, specific visual constraints — in a way that feels closer to how you’d instruct a language model. Because it literally is the same training pattern.
But there is a trade-off between both families of models. Sequential generation means early choices constrain later choices. If the model commits to a weird composition early, it may not recover, because every later token builds on that foundation. Diffusion models can sometimes fix things mid-way because they keep updating the entire image over many steps.
HOW TEXT ACTUALLY CONTROLS THE IMAGE
But regardless what family of model you use, they need to solve the same problem: how does your text prompt actually steer what gets generated?
The answer is attention. In both families, text tokens get encoded into vectors — embeddings that carry meaning like “high contrast,” “studio lighting,” “clean background.” During generation, the attention mechanisms let the model decide what text information should influence what image region, at each step or each token.
So, prompt conditioning is injected throughout the entire generation process. And it’s also why prompt engineering actually matters — the more specific and structured your prompt, the more the attention mechanism has to work with, and the more and better it will influence the image generation process.
When you don’t provide it a detailed prompt, it will just guess the rest based on its training data. So the image will look more generic.
When this alignment works well, you get what you want. Your face stays your face. The background changes. The lighting shifts. The text lands where it should. When it works badly, you get the classic failures. Identity drift. Weird hands. Melted typography. Or the model following half your prompt and silently ignoring the other half. We’ve all been there, right?
CREATING VS. EDITING
This also explains the difference between text-to-image and image editing.
Text-to-image is conditioning on text only. You start from noise or a blank token canvas and generate a full image guided by the prompt only and the model’s training knowledge.
Image editing is conditioning on text plus an existing image. Your photo gets encoded and fed in as context. The model learns which parts to preserve and which to change, because it was trained on tasks that explicitly reward that behavior. In diffusion, the model starts from a partially noised version of your input, so it has “room” to modify things while staying anchored to the original. In autoregressive editing, it generates a new sequence that stays consistent where needed while applying the transformation.
If you’ve ever hired a designer, this part will feel familiar. You give intent, constraints, and examples. They produce something new based on learned visual priors.
WHY THEY FAIL (AND WHAT TO DO ABOUT IT)
Now, I want to be clear about something, because I see a lot of people assume there’s a tiny designer brain inside the model making a plan and executing it.
And that’s exactly why they can be absurdly impressive and still mess up basic stuff. They’re generating plausible structure, not simulating the world. Most of the time, that’s more than enough. Sometimes you get a plausible completion that just isn’t what you meant.
So bringing this all back to what I actually do when I need a thumbnail.
I usually start with one strong input photo. Not two or three, else it combines noise and can worsen its understanding of me. Keep the prompt concise but packed with specifics — composition, lighting, contrast, text placement, the vibe you’re going for. I usually generate 2–3 variants and pick the winner. If the results aren’t right, I reduce degrees of freedom. Lock what matters — identity, framing — and vary only one thing at a time, like background style or lighting direction.
One thing I’ve learned over the years: if you don’t like the results, use the rerun button to restart the generation or, if the chat has been quite long and hectic, start a new chat instead of continuing the same thread. Even with the same model, a fresh context can give very different output. It shouldn’t matter, but it does.
Typography used to be a deal-breaker. For a long time, my process was “generate the image, add text in Canva.” Same with adding my face. Nano Banana changed that for me — it handles readable text on thumbnails better than anything I’d used before, especially through AI Studio where you can control resolution and aspect ratio precisely and generate without the Gemini watermark. But for models that still struggle with text, the fix is not “prompt harder.” The fix is do it in a separate controlled step.
Save prompts that worked. Save settings. Keep reference outputs. You’ll see real improvement over time, especially as models keep getting better.
So yeah, that’s image generation. Two families. Sculpting from noise or writing token by token. Both operating in compressed latent space, both guided by attention, both producing images that look like someone carefully designed them but were actually generated through statistical next-step prediction.
If you’re using Nano Banana or FLUX or anything else for thumbnails, infographics, whatever — I’d love to hear what works and what doesn’t for you. Drop it in the comments.
And if you want a follow-up on how this extends to video generation, which is a whole other level of complexity, let me know and I’ll make that next.
If you enjoyed this, follow and I’ll see you in the next one!
References
Latent Diffusion Models (Technical Overview)
https://people.cs.vt.edu/chris/cs6804_spring2023/slides/apoorv_generation.pdf
FLUX.2 — Black Forest Labs
FLUX.2 Dev (Replicate Documentation)
https://replicate.com/black-forest-labs/flux-2-dev/readme
Flow Matching for Generative Modeling
https://arxiv.org/abs/2210.02747
Rectified Flow
https://arxiv.org/abs/2209.03003
Nano Banana — Google DeepMind
https://deepmind.google/models/gemini-image/
Autoregressive Model Beats Diffusion (LLaMA for Image Generation)
https://arxiv.org/abs/2406.06525
FAQ
How does AI image generation work?
The model starts from learned visual patterns and uses the text prompt as guidance for what kind of image should emerge.
Why do prompts change the image?
The prompt gives the model constraints. The model then searches for an output that looks plausible and matches those constraints.
What should users be careful about?
Generated images can look confident while inventing details, breaking structure, or hiding artifacts in faces, hands, text, or motion.
Does a text prompt directly draw pixels?
No. The prompt becomes a learned representation that guides a generative process toward matching visual patterns.
What two constraints shape a generated image?
The result should resemble a plausible image from the training distribution and match the requested description.
What are the two main families of AI image generators?
Diffusion and flow models refine noise into an image, while autoregressive models generate visual tokens one piece at a time.